I finally got around to part two of my mudroom transformation. I never liked the back door that leads into the garage. It was flat, white, and constantly covered in fingerprints. I decided that it could be a canvas instead of an eyesore. First, I painted the door a dark charcoal grey. I love that color! Then it was just figuring out what to paint on it.
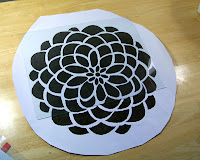
I have wanted a wall stencil for quite some time but since they sell for about $100, I never got one. Then I remembered that I used to cut my own stencils years ago. I blew up an image I found online for about $2. Then I bought some plastic sheet protectors for $1.50 and joined them to make one large piece of plastic. So the total cost of my wall stencil was $3.50. That's the kind of price I like.
Here's the process.
I put the blown up image on the table and covered it with a sheet of glass I took out of a picture frame. Make sure you tape the image to the table so it doesn't shift on you.
Place plastic sheet over that and tape it down.
This is a wood burning tool. They are about $15 dollars at the craft store. Plug it in and wait just a minute or two to heat up. Don't wait too long because they can get too hot and then it doesn't give you a sharp cut.
Trace the image with the burner and it will cut the plastic beautifully. Then once it is all cut, just pop the excess plastic out. Voila! You have a wall stencil.
Spray the back of the stencil with a light coating of craft adhesive and stick it to the surface. Then tape the edges. This helps prevent the paint from bleeding underneath the stencil and also just holds it in place. Don't worry - the adhesive won't stay on the wall. It will dry right along with the paint.
Use a stencil paint brush and lightly dry brush the paint on - you use a dabbing motion with very little paint until all of the open portions of your stencil are covered. Take you time with this.
Slowly pull your stencil off and your image is revealed. I love how this turned out.
The finished doorway. It's so fun and welcoming. I have a saying made of vinyl that will be the finishing touch.
I took my sister-in-law's advice and added hooks at 40" so that the kids could hang up their own things. I love how it turned out.
This is how the mudroom looks today. I am still working on accessories and I'm looking for a small chandelier but that will come in time. This is a fun, easy project that doesn't cost much but makes a huge impact. Give it a try. :)


1 comment:
Oh my goodness that turned out beautifully, Becca! I love that you can make your own stencils! I was going to pay 20-30 bucks to order a stencil from a site. I am going to have to try to make it myself! Thanks for the inspiration!!!
Post a Comment