God Bless My Little Kitchen
God bless my little kitchen,
I love it's every nook.
And bless me as I do my work,
wash pots and pans and cook.
And meals that I prepare,
be seasoned from above.
With Thy blessing and Thy grace,
but most of all Thy love.
As we partake of earthly food,
the table for us spread.
We'll not forget to thank Thee, Lord,
who gives us daily bread.
So bless my little kitchen,
and those who enter in.
May they find nothing but,
joy and peace and happiness therein!
Stephanie Vlaanderen

You have one hour, maybe two to create, clean, discover and be the domestic goddess of your dreams. What now?
Saturday, January 21, 2012

Friday, January 20, 2012
15 ideas for Valentine's Day.....

Here are some ideas to consider for your someone special:
1* Trade babysitting with another couple you know - that way you can spend all of your fun money on the date and not childcare.
2* DIY lingerie = go through that pile of clothes you don't want anymore and pick out an outfit for each of you. Put each outfit in a gift bag with a pair of scissors. On Valentine's night, you each get to create the other person's lingerie. Fun!
3* Have a pedicure together. I know, not the usual thing for the guys but that's what makes it special. I think most men would love it. Go somewhere nice that has massage chairs and a good atmosphere.
4* Find a restaurant that has meaning to you - my husband and I both lived in Brazil for several years so last year he found a really nice Brazilian restaurant. Any little extra effort makes it so much more meaningful.
5* Go for a long walk, just the two of you. Hold hands, talk about what you love most about each other.
6* Go see a play - or go to a dinner theater. It's fun and is a little different than your typical dinner and a movie.
7* Get a couples massage. My husband and I have done this and it's so relaxing and nice to spend some time together.
8* Give them a little gift for every year that you have been married. It would be extra nice if you found something that represented each year. That way you could talk about good memories with each gift.
9* Have something sent to them at work. It's an oldy but a goody! Try sending something unique like a tray of cookies he can share with his co-workers or takeout from his favorite restaurant.
10* Drop the kids off with the Grandparents and take your spouse camping. Surprise them by having the car all packed - pick them up from work and take off.
11* Leave a trail of Hershey kisses from the door to the bedroom. Put a sweet note inside each kiss.
12* Heart his car - no this is not just for teenagers and newlyweds. Cut out paper hearts and cover his car in them. Another way to do this is fill his car with red and pink balloons. Put a love note inside each balloon.
13* Watch the video from your wedding day or look through your wedding album and talk about how wonderful the day was.
14* If it's close by, reserve the hotel room where you spent your wedding night.
15* If you keep journals - read passages from important days to each other. Days like when you first met, when he proposed, your wedding day, etc.
Whatever you choose to do - get planning! Make it special. It doesn't necessarily take a lot of money to show someone you love and appreciate them. The effort is what is important. Happy Vaentine's Day planning to you all! :)
Here are some other websites with good ideas:
http://www.oopseydaisyblog.com/2010/02/14-days-of-love.html
http://mudpiestudio.blogspot.com/2011/12/101-valentine-ideas-for-under-5.html
http://www.bhg.com/holidays/valentines-day/cards/make-your-own-valentines-day-gifts/#page=11
http://getbuttonedup.com/2011/02/09/tool-free-printable-top-5-things-i-heart-about-you-list/
Wednesday, January 18, 2012
Mudroom transformation part two...

I finally got around to part two of my mudroom transformation. I never liked the back door that leads into the garage. It was flat, white, and constantly covered in fingerprints. I decided that it could be a canvas instead of an eyesore. First, I painted the door a dark charcoal grey. I love that color! Then it was just figuring out what to paint on it.
I have wanted a wall stencil for quite some time but since they sell for about $100, I never got one. Then I remembered that I used to cut my own stencils years ago. I blew up an image I found online for about $2. Then I bought some plastic sheet protectors for $1.50 and joined them to make one large piece of plastic. So the total cost of my wall stencil was $3.50. That's the kind of price I like.
Here's the process.


Monday, January 16, 2012
Tuxedo front dress.....

Here is my latest project. I didn't use a pattern so I will try to explain how I did it. At the bottom of the post I will show links to different tutorials that have helped me.
 I used the same bodice pattern for this dress that I made for the sheet dress only shorter. All you do to make this is find a dress with a bodice that you like, lay it out on a large sheet of paper or plastic, trace it, and then cut it out leaving yourself a 5/8" seam allowance. I cut the back exactly the same as the front. I wanted it lined and the seams not to show so in actuality I cut 4 of the same pattern. Does that make sense? :) Two for the front panel, and two for the back.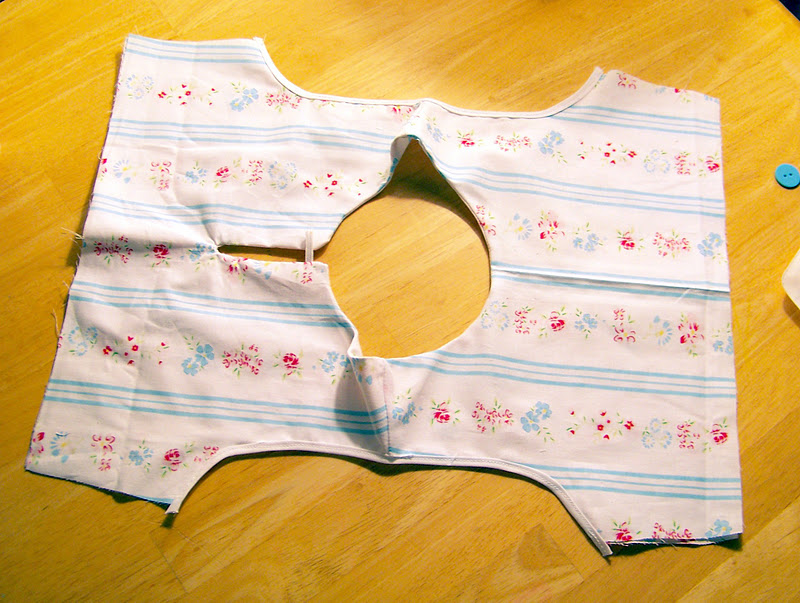
 For the front ruffle, I simple cut a 4" wide strip of fabric and hemmed the edges. You can serge them if you want to do it faster. Then change your stitch length longer. Run a stitch down the center of the fabric (don't back stitch of either end). To ruffle your fabric, hold onto the back thread and scoot the fabric down. I hope that makes sense.
  Then attach this to the front of the bodice, trim off the excess and sew on the buttons. I chose high contrast fabrics because I like that look but I think monotones would be just as beautiful. I found this fabric on a clearance sale. I got 2 yards for $3.25. I love the turquoise with the red. I added a band of red to the bottom of the bodice and skirt to tie it all together.
For the skirt, I simply made a wide tube, pleated it, and sewed it onto the bodice. Don't forget to overcast or serge the inside seams so that you don't get a lot of fraying when it's washed.


http://www.craftinessisnotoptional.com/2011/01/anthropologie-dress-knock-off-tutorial.html
http://fromanigloo.blogspot.com/2010/04/bubblegum-jumper-tutorial.html
Baked Brown-Sugar & Pepper Bacon!!!


Lay the bacon out in a single layer on a baking sheet lined with tin foil.

Sprinkle pepper over the bacon and then brown sugar. Kroger has an excellent brown sugar, zero calorie substitute that works beautifully.


Place the bacon on a few sheets of paper towel.
There you have it. Crispy, peppery, delicious bacon. The best part is that you put it in the oven and then you are free to prepare the rest of your breakfast. It is great on BLT's, in salads, you name it.
Saturday, January 14, 2012
Be back on Monday!!
Sorry about the complete lack of posts for the last few days. We have a pretty sick little girl in our house. Daily posts will resume on Monday.
Thanks and have a great weekend!
Thanks and have a great weekend!
Wednesday, January 11, 2012
Strawberry freezer jam... (sugar-free)
My Mom and Grandma always made freezer jam. Freezer jam is not cooked - making it taste much more like fresh fruit than it's canned counterpart. It is created using a pectin that forms a gel with far less sugar than traditional jams. It is the only jam I like and is extremely easy to make. This is a sugar free version but you are welcome to use regular sugar. My children love it! It is very economical to make especially considering you can use the jars over and over again. Something to note: I make a large batch, you can easily cut this recipe in half.
 Here are the things that you will need:
8 cups crushed strawberries (frozen or fresh)
2 pkg pectin - it will say freezer jam pectin
approx 6-8 plastic jars with lids
3 cups sweetener of your choice - sugar or artificial
That's it! Now lets get started!
 If you are using frozen strawberries, place them in a bowl and either let them thaw in your refrigerator or defrost them in the microwave before you make the jam.
 Once the strawberries are thawed then put them in your food processor and pulse them until you like the consistency. You will probably need to stop and stir it a little to get the top strawberries incorporated.
 I am not a "chunky jam" fan so I blend mine pretty well but it's completely up to you. You can leave it chunky or make it absolutely smooth - whichever your family prefers.
 Pour the sweetener or sugar in a bowl and add the pectin. Stir these together. Pour the blended strawberries in a bowl.
 Slowly add the sweetener/pectin mixture to the strawberries while you mix it in. Make sure you mix it well until it is completely incorporated. Then set your timer and stir for 3 minutes.
 Ladle the jam into your clean jars and put the lids on. These jars can be purchased at most grocery stores in the canning section. That is also where you will find the freezer jam pectin. Let the jars sit on your counter for 30 minutes to set up.
  Put the jars in your freezer. They can stay like this for up to a year. All you need to do now is pull one out, put it in your refrigerator until it thaws and enjoy! It will stay fresh in the fridge for up to 3 months. You will be amazed at how much better it tastes than the store bought version. It is far less expensive also. Then when these are all used up, just pull out your jars and make another batch.


8 cups crushed strawberries (frozen or fresh)
2 pkg pectin - it will say freezer jam pectin
approx 6-8 plastic jars with lids
3 cups sweetener of your choice - sugar or artificial
That's it! Now lets get started!


 Ladle the jam into your clean jars and put the lids on. These jars can be purchased at most grocery stores in the canning section. That is also where you will find the freezer jam pectin. Let the jars sit on your counter for 30 minutes to set up.
  Put the jars in your freezer. They can stay like this for up to a year. All you need to do now is pull one out, put it in your refrigerator until it thaws and enjoy! It will stay fresh in the fridge for up to 3 months. You will be amazed at how much better it tastes than the store bought version. It is far less expensive also. Then when these are all used up, just pull out your jars and make another batch.
Spread it on whole wheat toast for a nutritious breakfast. Pair it with natural peanut butter and you have a fantastic sandwich. You can do this! :)
P.S. You can make freezer jams with a lot of different fruits - raspberry, apricot, peach, etc.
Also something to note - jam made with real sugar will be sweeter than that made with artificial sweetener but both are equally yummy!
Subscribe to:
Posts (Atom)